Hello, Hello, Hello! As you can see, I'm NOT good at consistently blogging. I should work on that. Today though, I have a little mini tutorial on altering a matchbook style notepad. SUPER EASY people!! I mean it!
So as I was wandering around Michael's 2 weeks or so ago, they had a whole lot of bushel type baskets out, with tons of random crap inside, all on super clearance sale. For some reason, I can burrow around in bins like this in a craft store NO PROBLEM, but the clearance rack in a regular clothes store? No way. I am weird. So I rummaged around and found a little bit of this, and a little bit of that, and then I found these little matchbook style notepads. Wanna guess how much they were? Come on, guess. They were 2 in a pack too, if that helps at all. Give up? $0.40. FOR 2 OF THEM! That's $0.20 each for all of you who were told there would be no math on this blog (inside family joke if you're feeling lost). Jaaaaackpoooooottttttttt! So I did a little jig, and then I found as many of them as I could.
That weekend, Scrapkitchen came out with THE CUTEST Valentine's kit EVAH, Kiss Me Kate. I mean it man, CUTEST! So, naturally, I snagged that to decorate some of these little notepads. They are perfect for jotting down a quick I love you for your spouse, or for kids lunchboxes, or for whatever. Here's the kit. ::swoon::

Now it was time to play. So first, I measured the notepad. I pulled the front out from behind it's little flap, and I measured from that end, down the back, around the bottom, and to the top of the flap. It was a random number, so I ended up just going with an 11" length. Easy. Peasy. Then I measured the width of the notepad, which was about 3 1/8". Once I knew my dimensions, I opened up photoshop and created a new document 3.25" wide by 11" tall (I always give myself some wiggle room). Then I opened up aaaaaaaallllllll the patterned papers in the kit, and dragged and dropped them onto my 3.25"x11" blank document. Lots of times I will resize papers next, but since I was working with 11" I just left them as is. I like to play with all of the papers open to see different combinations and what I like and don't like. If I don't like a paper, I either turn off that layer, or delete it from the file I'm working in.
Next, I pulled in a bunch of different embellishments from the kit. Those hearts with the scalloped circle mats were calling my name! I also grabbed 2 labels and 2 postage stamps (when it comes to embellishments, I tend to print out a few extras as I go, cuz I'm bound to change my mind several times before I actually glue anything down). I resized those to fit in the space on the front flap, and I was good to go.
My next step, once I have the design how I want it, is to open a new document that is 8.5"x11". I have my printer set to always print borderless (plus, in the advanced settings, make sure the resizing scale is set to minimal - otherwise it'll blow up your print and things will get wonky) so check your settings if this is something you're interested in. I then drag and drop my papers and embellishments onto the new document, and move them around until I fit everything I possibly can onto 1 sheet of printer paper. Once you're satisfied with the arrangement, flatten it and save it as a jpeg, and then print it out. While generally unnecessary, I like to give my papers a little bit of time after printing to dry so I minimize the smudge potential. Once they set, I just cut everything up. I like to print multiple projects at once, and then I can cut out all the bits and pieces while I watch tv one night. :)
So now you've got everything printed and cut out, it's time to play! Here are my supplies:

First, I opened up the notepad and put a line of my adhesive at the end of the cover flap. Then I lined up one edge of my chosen paper, and adhered it to the flap. Then I added some more adhesive to the rest of the front flap, and flattened the paper down onto it. I have an overhang on one end, but I will fix that later. Now, when you're dealing with things that need to be folded around, it's easiest to pre-fold it, and then adhere it. So with the front nicely glued down, I folded it around the top edges of the flap. Just use a little pressure to tell the paper where you want it to go. Now leave that, and get your second, contrasting piece of paper for the front flap. Do the same thing: glue it down to the front of the flap, then fold it around to the back of the notepad. Now you can see and decide which paper you want on top, and where you want the paper to end. Once that's done, just glue the papers down (I did not glue the paper to the thin folded spots, only to the main front and back of the notepad). You can see in the photo below, how I wrapped the papers around and then cut them down to the size I wanted.

Now just add whatever embellishments you desire, and you're done! I added "SWAK" (sealed with a kiss) to each label piece with Making Memories rub-ons from my stash. I just love a good alphabet rub-on set!
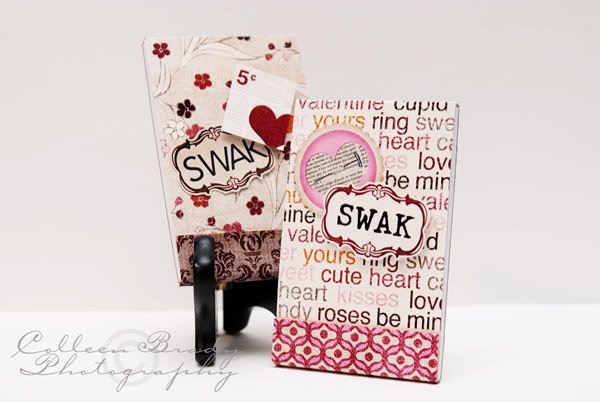

So, stinkin, cute! And you can make these for anything your heart desires with all the awesome digital kits that are out there now. Make one for groceries, make one for books you want to read for when you go to the library or the book store, one for movies, one for just random thoughts that pop into your head. The possibilities are endless!!
I hope you enjoyed my little tutorial! Next time I'll take more pictures :)
Have a great day!
~Col


4 comments:
Those are so sweet, colleen. Thanks so much for sharing.
adorable! And doable too, which is the toughest part for me and hybrid!
These are wonderful Col! Gives me an idea for a project I want to do this week not to mention that now I think I need that kit. :)
So stinkin' cute! Your instructions are great but that still doesn't fix the fact that me, scissors and glue do not get along.
Post a Comment