With all this snow we've gotten, it felt like the blog needed a little face lift to something a bit frostier. Once again, Zoe saves the day! WOOT!
I'm getting some pictures edited from Snow-mageddon Part 2. We ended up snowed in for 2 days this week (wednesday and thursday) and got another 2 feet of snow. That's around 5 feet of snow in less than a week. ::blink:: I love snow and being snowed in, but that's just nuts! Lol! Of course it's made even worse because this state has no idea how to deal with that sort of volume of snow in such a short amount of time. There are a lot of streets in the city that will only be passable if the residents dig it out themselves (with some help from the sun). The plows just can't get through without risking a LOT of damage to vehicles, and it's not a risk that they are going to take (especially considering we're over budget on snow removal this season, and the economy in general just blows).
Tiger is still thoroughly enjoying herself and all the snow. I can only guess that the snow makes everything smell differently, because she has sniffed every square inch of the yard at least 3 times since we got it all, lol. It's the same yard Tigah-now! We do have a few sets of small tracks in the as-yet-untouched backyard, which is pretty cool to look at from the windows. We think they're rabbit tracks ("wwwwwwaaabbits", no RRabbits, "wabbits", RRRRRRRRabbits, "wwwwwwwaaabbits" - I love that commercial :P) because they are too close together to be deer, and we don't have much else in terms of "wildlife" around here. Plus, the snow is so thick and dense, a light-weight rabbit wouldn't sink too far into it.
Anyway, I've got more pictures and more projects in the works. Some girlfriends are coming over tomorrow to work on planning Lauren's bridal shower next month, so that will be fun. Speaking of which, I've got some cardstock to go cut up for invitations! Have a great night, and a great Valentine's Day if I don't get back to post again :)
~Col
Friday, February 12, 2010

Tuesday, February 9, 2010
Snow-mageddon Part 1 of 2??
So, we got slammed with that big storm last week. That's what they were calling it - "Snow-mageddon". ON THE NEWS! Ridiculous. I mean, if we lived in Florida and got almost 3 feet of snow, sure, Snow-mageddon is appropriate. But we are *not* that far south people! Just because we're below the Mason-Dixon line doesn't mean the weather magically changes!
We woke up friday morning, and I took a look at the radar. It showed that DC was already getting snow (supposedly) so I opted to stay home and work from home instead of going into the office. Jordan forgot his power supply for his laptop, so he went into work. It ended up not starting to snow until 2 or 3 in the afternoon, and then it was just flurries. Jordan left slightly earlier than a normal day, but then went and did some grocery shopping that we needed to do. Not "OMG WE HAVE TO GO BUY MILK AND BREAD AND EGGS OR WE'LL DIE IN THIS STORM!!" shopping, just some regular grocery shopping that we were due to take care of. But that's really how people around here think. The stores get mobbed and sell out of milk, bread, eggs, and toilet paper. I mean, they are really miserable at snow removal down here, but are you really going to go through 4 gallons of milk in 2 days? Are you really going to go to the bathroom THAT MUCH that you need 2 - 18 count packages of toilet paper? Let's use some common sense here people.
So we (and by we, I mean Jordan) took care of that, and then just hung out for the night. My saturday plans had been cancelled, so I had nothing to do. I stayed up later than normal, and at midnight when I went to bed we had maybe 6" of snow. No big deal. We were woken up at 9am to the sounds of heavy equipment backing up repeatedly. BEEP! BEEP! BEEP! *wait 20 seconds* BEEP! BEEP! BEEP! *wait 30 seconds* BEEP BEEP you get the idea :p Jordan gets up to look out the window and discovers 2 things. 1) We had gotten 12-18 inches of snow overnight (WOOT!!) and 2) The neighbors across the way were "plowing" their driveway with a backhoe. A BACKHOE! We literally just watched in complete awe of the situation. It was stupid for 2 reasons. 1) IT'S A FREAKING BACKHOE!! 2) It was still coming down VERY heavily, and wasn't forecasted to stop for at least 6 hours, potentially 8-10 hours. So they were going to get a good bit more snow, and still have to clear things off again later. At 10 or so, Tiger couldn't hold it any longer and Jordan was forced to out the small front porch and dig her a path in the yard so she could do her business. She loooooooooooves the snow, and is absolutely hilarious to watch when she plays in it. But this was a relatively quick time outside. Jordan didn't feel like doing any shoveling yet, so in we went. I made breakfast, and we just relaxed all day. Snow snow snow snow snow, crazy people on tv out in the weather, snow snow snow snow snow, Snow-mageddon!!! At around 2 or 3 in the afternoon, it started letting up (we were in white conditions at one point!) so we bundled up to venture outside. We got somewhere between 30-36" of snow. It's hard to tell because there were drifts everywhere, some as high as 5 feet tall on the side of the house. Baltimore got 30" and we always seem to get a good bit more than they do, so between 30-36" is a good estimate. Here are some pictures of Tigah-now romping around :)
Playing in deep snow:
Step 1 - Dive in head first

Step 2 - Land and rear back

Step 3 - LEAP!!!

Since the snow was so deep, she couldn't touch the ground, but that certainly didn't stop her! She jumps really high in the air to get herself up and over the snow, sort of like a deer. Regardless, it's hilarious. I really need to charge my point and shoot and take some video of it. It's still deep in the backyard, we haven't made too much of a path back there yet.
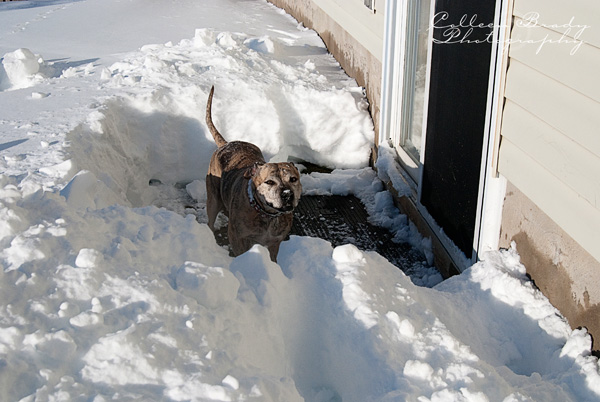
These 2 give a good idea of how deep it is. It's thick snow, so it compacts underneath you but you don't hit the actual ground. This is a path down the side of the house towards the sliding glass door. She really stretches herself out when she runs, lol!
 Just keep swimming, just keep swimming, just keep swimming.... :)

At the back door:

Pretty ones:
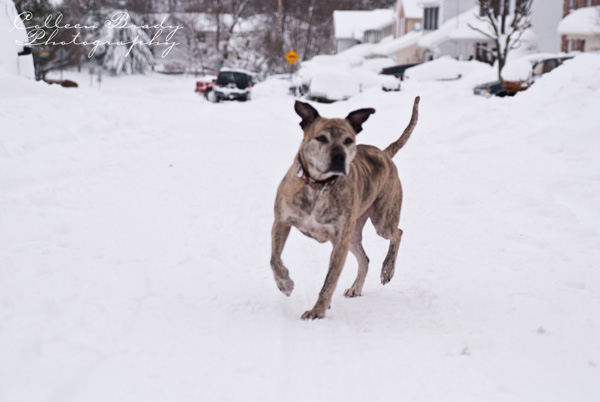
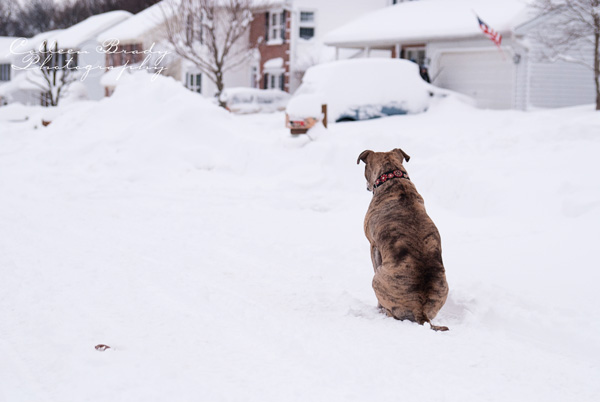
I just love her "serious concentration" face. She's SO focused on something down the street - probably neighbors shoveling themselves out.


And one last one that makes me :swoon:

I love this one. We were in the road because she could actually run around and sniff things out there, as nothing else was shoveled. And it's not like there was a whole lot of traffic to worry about, lol. But she just kept sitting down, keeping watch on things. It was so cute :)
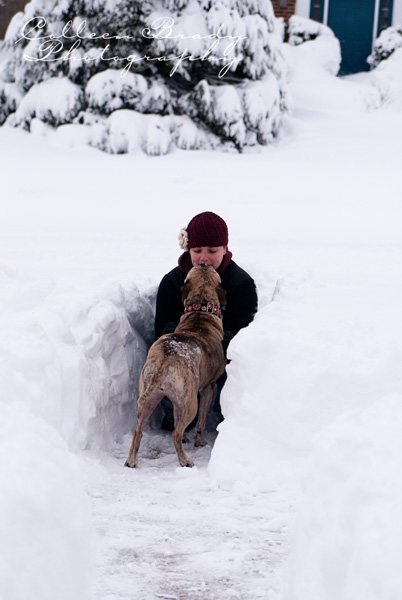
 Last one (for now anyway), kisses for momma!
 Everything is still pretty much a disaster. My PE prep course was cancelled last night because the roads and parking lot weren't plowed. The Federal Government was closed yesterday. About 9 counties of schools were closed yesterday AND today. I have 2 friends who are pretty much SOL at this point. One lives in a cul-de-sac and still hasn't seen a plow (it's 3 days later!!) and the other lives in the city and was told that they weren't getting plowed. As in at all! No plows! She had to hike to a clear street and get a ride into work from a coworker today.
What's worse (besides Jordan spending our entire commutes going on and on about how miserable the plow people are down here :p) is that another storm is coming in today and we're supposed to get anywhere from 10-20 inches!! They had to call people into work to shovel off the roof today. It can safely hold 30" of snow, but we already have 24" up there, and who knows how much this storm is gonna dump on us tonight. Better to be safe than sorry!
I'm already counting on a snow day from work tomorrow (I have stuff I can bring home that I can work on), and I have zero faith that I'll class tomorrow night either. SUCH a mess! We shall see if tonight brings us Snow-mageddon Part 2!! Hahahahahaha!!
~Col
We woke up friday morning, and I took a look at the radar. It showed that DC was already getting snow (supposedly) so I opted to stay home and work from home instead of going into the office. Jordan forgot his power supply for his laptop, so he went into work. It ended up not starting to snow until 2 or 3 in the afternoon, and then it was just flurries. Jordan left slightly earlier than a normal day, but then went and did some grocery shopping that we needed to do. Not "OMG WE HAVE TO GO BUY MILK AND BREAD AND EGGS OR WE'LL DIE IN THIS STORM!!" shopping, just some regular grocery shopping that we were due to take care of. But that's really how people around here think. The stores get mobbed and sell out of milk, bread, eggs, and toilet paper. I mean, they are really miserable at snow removal down here, but are you really going to go through 4 gallons of milk in 2 days? Are you really going to go to the bathroom THAT MUCH that you need 2 - 18 count packages of toilet paper? Let's use some common sense here people.
So we (and by we, I mean Jordan) took care of that, and then just hung out for the night. My saturday plans had been cancelled, so I had nothing to do. I stayed up later than normal, and at midnight when I went to bed we had maybe 6" of snow. No big deal. We were woken up at 9am to the sounds of heavy equipment backing up repeatedly. BEEP! BEEP! BEEP! *wait 20 seconds* BEEP! BEEP! BEEP! *wait 30 seconds* BEEP BEEP you get the idea :p Jordan gets up to look out the window and discovers 2 things. 1) We had gotten 12-18 inches of snow overnight (WOOT!!) and 2) The neighbors across the way were "plowing" their driveway with a backhoe. A BACKHOE! We literally just watched in complete awe of the situation. It was stupid for 2 reasons. 1) IT'S A FREAKING BACKHOE!! 2) It was still coming down VERY heavily, and wasn't forecasted to stop for at least 6 hours, potentially 8-10 hours. So they were going to get a good bit more snow, and still have to clear things off again later. At 10 or so, Tiger couldn't hold it any longer and Jordan was forced to out the small front porch and dig her a path in the yard so she could do her business. She loooooooooooves the snow, and is absolutely hilarious to watch when she plays in it. But this was a relatively quick time outside. Jordan didn't feel like doing any shoveling yet, so in we went. I made breakfast, and we just relaxed all day. Snow snow snow snow snow, crazy people on tv out in the weather, snow snow snow snow snow, Snow-mageddon!!! At around 2 or 3 in the afternoon, it started letting up (we were in white conditions at one point!) so we bundled up to venture outside. We got somewhere between 30-36" of snow. It's hard to tell because there were drifts everywhere, some as high as 5 feet tall on the side of the house. Baltimore got 30" and we always seem to get a good bit more than they do, so between 30-36" is a good estimate. Here are some pictures of Tigah-now romping around :)
Playing in deep snow:
Step 1 - Dive in head first
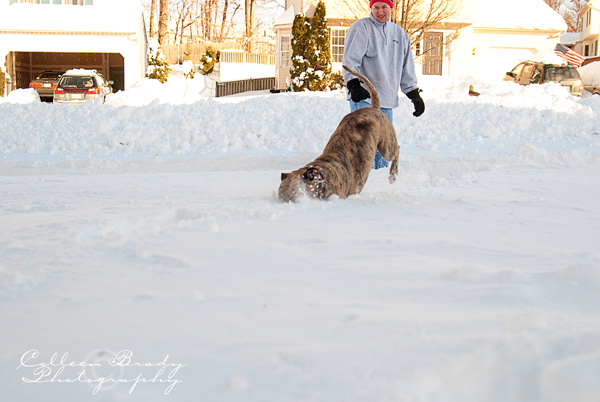
Step 2 - Land and rear back

Step 3 - LEAP!!!
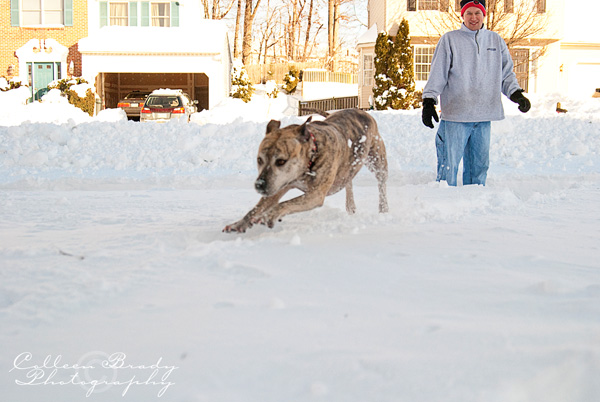
Since the snow was so deep, she couldn't touch the ground, but that certainly didn't stop her! She jumps really high in the air to get herself up and over the snow, sort of like a deer. Regardless, it's hilarious. I really need to charge my point and shoot and take some video of it. It's still deep in the backyard, we haven't made too much of a path back there yet.
These 2 give a good idea of how deep it is. It's thick snow, so it compacts underneath you but you don't hit the actual ground. This is a path down the side of the house towards the sliding glass door. She really stretches herself out when she runs, lol!


At the back door:
Pretty ones:
I just love her "serious concentration" face. She's SO focused on something down the street - probably neighbors shoveling themselves out.

I REALLY wish I had gotten this one in focus. This, for me, is the epitome of Tigah-now. Serious face, running around, goofy floppy ears flying in the wind. :)
And one last one that makes me :swoon:

I love this one. We were in the road because she could actually run around and sniff things out there, as nothing else was shoveled. And it's not like there was a whole lot of traffic to worry about, lol. But she just kept sitting down, keeping watch on things. It was so cute :)
What's worse (besides Jordan spending our entire commutes going on and on about how miserable the plow people are down here :p) is that another storm is coming in today and we're supposed to get anywhere from 10-20 inches!! They had to call people into work to shovel off the roof today. It can safely hold 30" of snow, but we already have 24" up there, and who knows how much this storm is gonna dump on us tonight. Better to be safe than sorry!
I'm already counting on a snow day from work tomorrow (I have stuff I can bring home that I can work on), and I have zero faith that I'll class tomorrow night either. SUCH a mess! We shall see if tonight brings us Snow-mageddon Part 2!! Hahahahahaha!!
~Col
Tuesday, February 2, 2010
A little Mini Tutorial
Hello, Hello, Hello! As you can see, I'm NOT good at consistently blogging. I should work on that. Today though, I have a little mini tutorial on altering a matchbook style notepad. SUPER EASY people!! I mean it!
So as I was wandering around Michael's 2 weeks or so ago, they had a whole lot of bushel type baskets out, with tons of random crap inside, all on super clearance sale. For some reason, I can burrow around in bins like this in a craft store NO PROBLEM, but the clearance rack in a regular clothes store? No way. I am weird. So I rummaged around and found a little bit of this, and a little bit of that, and then I found these little matchbook style notepads. Wanna guess how much they were? Come on, guess. They were 2 in a pack too, if that helps at all. Give up? $0.40. FOR 2 OF THEM! That's $0.20 each for all of you who were told there would be no math on this blog (inside family joke if you're feeling lost). Jaaaaackpoooooottttttttt! So I did a little jig, and then I found as many of them as I could.
That weekend, Scrapkitchen came out with THE CUTEST Valentine's kit EVAH, Kiss Me Kate. I mean it man, CUTEST! So, naturally, I snagged that to decorate some of these little notepads. They are perfect for jotting down a quick I love you for your spouse, or for kids lunchboxes, or for whatever. Here's the kit. ::swoon::

Now it was time to play. So first, I measured the notepad. I pulled the front out from behind it's little flap, and I measured from that end, down the back, around the bottom, and to the top of the flap. It was a random number, so I ended up just going with an 11" length. Easy. Peasy. Then I measured the width of the notepad, which was about 3 1/8". Once I knew my dimensions, I opened up photoshop and created a new document 3.25" wide by 11" tall (I always give myself some wiggle room). Then I opened up aaaaaaaallllllll the patterned papers in the kit, and dragged and dropped them onto my 3.25"x11" blank document. Lots of times I will resize papers next, but since I was working with 11" I just left them as is. I like to play with all of the papers open to see different combinations and what I like and don't like. If I don't like a paper, I either turn off that layer, or delete it from the file I'm working in.
Next, I pulled in a bunch of different embellishments from the kit. Those hearts with the scalloped circle mats were calling my name! I also grabbed 2 labels and 2 postage stamps (when it comes to embellishments, I tend to print out a few extras as I go, cuz I'm bound to change my mind several times before I actually glue anything down). I resized those to fit in the space on the front flap, and I was good to go.
My next step, once I have the design how I want it, is to open a new document that is 8.5"x11". I have my printer set to always print borderless (plus, in the advanced settings, make sure the resizing scale is set to minimal - otherwise it'll blow up your print and things will get wonky) so check your settings if this is something you're interested in. I then drag and drop my papers and embellishments onto the new document, and move them around until I fit everything I possibly can onto 1 sheet of printer paper. Once you're satisfied with the arrangement, flatten it and save it as a jpeg, and then print it out. While generally unnecessary, I like to give my papers a little bit of time after printing to dry so I minimize the smudge potential. Once they set, I just cut everything up. I like to print multiple projects at once, and then I can cut out all the bits and pieces while I watch tv one night. :)
So now you've got everything printed and cut out, it's time to play! Here are my supplies:

First, I opened up the notepad and put a line of my adhesive at the end of the cover flap. Then I lined up one edge of my chosen paper, and adhered it to the flap. Then I added some more adhesive to the rest of the front flap, and flattened the paper down onto it. I have an overhang on one end, but I will fix that later. Now, when you're dealing with things that need to be folded around, it's easiest to pre-fold it, and then adhere it. So with the front nicely glued down, I folded it around the top edges of the flap. Just use a little pressure to tell the paper where you want it to go. Now leave that, and get your second, contrasting piece of paper for the front flap. Do the same thing: glue it down to the front of the flap, then fold it around to the back of the notepad. Now you can see and decide which paper you want on top, and where you want the paper to end. Once that's done, just glue the papers down (I did not glue the paper to the thin folded spots, only to the main front and back of the notepad). You can see in the photo below, how I wrapped the papers around and then cut them down to the size I wanted.

Now just add whatever embellishments you desire, and you're done! I added "SWAK" (sealed with a kiss) to each label piece with Making Memories rub-ons from my stash. I just love a good alphabet rub-on set!
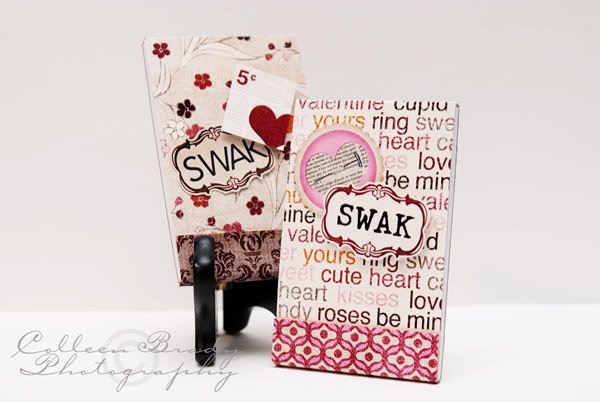

So, stinkin, cute! And you can make these for anything your heart desires with all the awesome digital kits that are out there now. Make one for groceries, make one for books you want to read for when you go to the library or the book store, one for movies, one for just random thoughts that pop into your head. The possibilities are endless!!
I hope you enjoyed my little tutorial! Next time I'll take more pictures :)
Have a great day!
~Col
Thursday, January 21, 2010
Upside-down Tigah-now!
Playing around with Flickr and found this fun option to blog a photo right from my photo stream. Figured I'd give it a shot.
I snapped that photo last week and finally got it edited. Can I just say that there's nothing like winter, with it's lack of natural light by the time we get home from work, to remind me how much I love my speed light? Lol! That photo is barely edited. I bumped the contrast a smidge, and added in a bit of black, and that was it! I wish I had gotten her nose in focus instead of her shoulder, but she was NOT cooperating that night so this is the best I could do.
I did a post over at the Sweet Shoppe Blog yesterday, so if you missed it, go here to check it out :)
Hopefully more posting coming soon. :) I have some fun with LR presets I want to post about, but I forgot to write down which photo used which preset, so I'll try again tomorrow. For now, you get silly Tigah-now :)
More hybrid goodies coming soon too. I've fallen in love with creating hybrid layouts (something I never did before), and I'm excited to show off some examples.
Have a great day!
~Col

I snapped that photo last week and finally got it edited. Can I just say that there's nothing like winter, with it's lack of natural light by the time we get home from work, to remind me how much I love my speed light? Lol! That photo is barely edited. I bumped the contrast a smidge, and added in a bit of black, and that was it! I wish I had gotten her nose in focus instead of her shoulder, but she was NOT cooperating that night so this is the best I could do.
I did a post over at the Sweet Shoppe Blog yesterday, so if you missed it, go here to check it out :)
Hopefully more posting coming soon. :) I have some fun with LR presets I want to post about, but I forgot to write down which photo used which preset, so I'll try again tomorrow. For now, you get silly Tigah-now :)
More hybrid goodies coming soon too. I've fallen in love with creating hybrid layouts (something I never did before), and I'm excited to show off some examples.
Have a great day!
~Col
Tuesday, January 5, 2010
A Reorganization
I don't know about you guys, but I have a few obsessions in my life. One, is all things paper and stationary (hence the scrapbooking). Ever since I was little I've loved notebooks and pens and pencils. I'm constantly buying new little notebooks, whether it's to alter them, or just to have them. I rarely even write in them, I just like having pretty notebooks around. This has also lead to a LARGE stash of pretty patterned scrapbook paper. Again though, I rarely use it. I'm not confident in my paper pages like I am in my digital pages, so I never want to cut into the pretty papers and "ruin" them. It's a vicious cycle! Thank goodness digital papers have LIMITLESS uses! I can print out 50 sheets now, and another 50 in 10 years if I wanted to!
My second obsession is ironically, all things related to organization. Planners, containers, folders, labels, I love them all. The ironic part? I get them, and then fail to implement them! I bought the CUTEST little red polka dot planner last year, and I carried it around with me for about 2 months, and then it just sat on my desk. Worst! I was also keeping half of my schedule in the planner, and half in my phone (a Blackberry at the time), which lead to forgetting things ALL THE TIME. Seriously a useless strategy.
My craft area is in our master bedroom, because our master bedroom is massive. I mean it. It's 29'x12'! Long and narrow, which isn't as bad as it sounds. The door to enter the room and the door to the master bathroom kinda divide the room up into 3 areas. The bed is on one end, the recliner/exercise bike/dog bed/dressers are in the middle, and my craft area is on the other end. This works out great because it means I don't take up the small bedroom upstairs as a complete craft room (it's too tiny to serve as my craft room AND a guest bedroom, and we need all the beds we can get when family comes to visit). This works out not so great because I am the world's greatest piler and it drives Jordan insane. Piles here, piles there, craft stuff exploding out of drawers and containers. He hates it. And rightfully so! So last night I went out and bought 3 more of those pretty little white cube organizers from Michael's (on sale! WOOT!). I have this tabletop from Ikea that I LOVE. I try not to keep too much stuff underneath the glass, so I can just scoot projects in there when I need the tabletop (notice I said "try"). I wanted the trestle legs that they show in another configuration, but Ikea was always sold out, so I had to make do with something different. I could still put things on the legs (similar to the trestle), but it wasn't that efficient. Enter the white cubes. I had 6 of them on a different wall underneath a set of shelves, and they worked just fine. But then I saw this desk from Pottery Barn, and it was all over. I LOVE the little cubbies to put things in, and it makes much better use of the space under the table. Except there's no way I could ever buy that desk set (ugh, it's on sale now too, but still, Jordan would never let me spend that much on a DESK). So. The idea entered my head that I could use these cubes from Michael's and make my own little pretend PB set up. So last night I got 3 more (I couldn't decide which 2 I wanted, so I got 3, but it still works). I then came home and dismantled that entire end of the room. Not my brightest idea considering I was supposed to take down the Christmas tree (and then Jordan said he would do it, and then he didn't do it either!). Regardless, I got it set up pretty well last night with a little help from Jordan (that tabletop is HEAVY!). So now I have 4 cubes under each end of the table, and then 2 more on top of 1 end to hold my most used stuffs. 4 of the cubes have shelves in them perfect for storing all (or a LOT) of my papers, 2 have 3 drawers, 2 have 1 drawer and a shelf, and 2 have paper storage and 2 narrow bins each. I will take pictures in a day or two when it's aaaaall finished.
Of course, the room is still a disaster area, and I still have to take down the Christmas treee. But it's a start! The new year always leaves me wanting to start everything fresh, and this will be a good start. It will help eliminate the clutter, it will get piles of stuff out from in front of the back windows (which Jordan REALLY hated), and I will have a more efficient space.
The thing I don't want to think about? The fact that I will have to move and rearrange everything whenever we decide to put in hardwood floors. Doh. Yea, not thinking about that right now. Just thinking of a wonderfully organized new space! WOOT!!
Crafty things are coming soon. I've got a few projects in various stages of completion, so I can hopefully get those done soon too. :)
~Col
My second obsession is ironically, all things related to organization. Planners, containers, folders, labels, I love them all. The ironic part? I get them, and then fail to implement them! I bought the CUTEST little red polka dot planner last year, and I carried it around with me for about 2 months, and then it just sat on my desk. Worst! I was also keeping half of my schedule in the planner, and half in my phone (a Blackberry at the time), which lead to forgetting things ALL THE TIME. Seriously a useless strategy.
My craft area is in our master bedroom, because our master bedroom is massive. I mean it. It's 29'x12'! Long and narrow, which isn't as bad as it sounds. The door to enter the room and the door to the master bathroom kinda divide the room up into 3 areas. The bed is on one end, the recliner/exercise bike/dog bed/dressers are in the middle, and my craft area is on the other end. This works out great because it means I don't take up the small bedroom upstairs as a complete craft room (it's too tiny to serve as my craft room AND a guest bedroom, and we need all the beds we can get when family comes to visit). This works out not so great because I am the world's greatest piler and it drives Jordan insane. Piles here, piles there, craft stuff exploding out of drawers and containers. He hates it. And rightfully so! So last night I went out and bought 3 more of those pretty little white cube organizers from Michael's (on sale! WOOT!). I have this tabletop from Ikea that I LOVE. I try not to keep too much stuff underneath the glass, so I can just scoot projects in there when I need the tabletop (notice I said "try"). I wanted the trestle legs that they show in another configuration, but Ikea was always sold out, so I had to make do with something different. I could still put things on the legs (similar to the trestle), but it wasn't that efficient. Enter the white cubes. I had 6 of them on a different wall underneath a set of shelves, and they worked just fine. But then I saw this desk from Pottery Barn, and it was all over. I LOVE the little cubbies to put things in, and it makes much better use of the space under the table. Except there's no way I could ever buy that desk set (ugh, it's on sale now too, but still, Jordan would never let me spend that much on a DESK). So. The idea entered my head that I could use these cubes from Michael's and make my own little pretend PB set up. So last night I got 3 more (I couldn't decide which 2 I wanted, so I got 3, but it still works). I then came home and dismantled that entire end of the room. Not my brightest idea considering I was supposed to take down the Christmas tree (and then Jordan said he would do it, and then he didn't do it either!). Regardless, I got it set up pretty well last night with a little help from Jordan (that tabletop is HEAVY!). So now I have 4 cubes under each end of the table, and then 2 more on top of 1 end to hold my most used stuffs. 4 of the cubes have shelves in them perfect for storing all (or a LOT) of my papers, 2 have 3 drawers, 2 have 1 drawer and a shelf, and 2 have paper storage and 2 narrow bins each. I will take pictures in a day or two when it's aaaaall finished.
Of course, the room is still a disaster area, and I still have to take down the Christmas treee. But it's a start! The new year always leaves me wanting to start everything fresh, and this will be a good start. It will help eliminate the clutter, it will get piles of stuff out from in front of the back windows (which Jordan REALLY hated), and I will have a more efficient space.
The thing I don't want to think about? The fact that I will have to move and rearrange everything whenever we decide to put in hardwood floors. Doh. Yea, not thinking about that right now. Just thinking of a wonderfully organized new space! WOOT!!
Crafty things are coming soon. I've got a few projects in various stages of completion, so I can hopefully get those done soon too. :)
~Col
Saturday, January 2, 2010
Hello 2010.
I saw this quote today, and it felt appropriate:
“2010 is an unwritten chapter…love deeply, live boldly, and go after something big!”
I hate resolutions, so I try not to make them. Are there things I want to improve upon in my life? Of course! But resolutions only end up making you feel like crap because you don't complete them. But I want to love deeply, and live boldly, and go after something big, so that works out nicely :P
I want to show my husband how deeply I love him, all the time.
I want to live boldly and do big things.
I want to seriously work on my photography skills, and put myself out there to do pet photography sessions.
I want to really work on stationary designs for a new website, and grow that aspect of my creativity.
I want to continue to grow creatively as a hybrid artist, and a life artist.
Professionally, I'll be taking the PE Exam in April (which terrifies me), and taking on more responsibility in the coming year. I hope to grow as an engineer and as a project manager. I hope to solidify my career before we decide to start a family and things get thrown upside-down.
2009 turned into a whirl-wind of a year and just FLEW by. I know that time slows for no man, but I hope to slow things down a bit and learn to enjoy life more fully. Put that project aside and get together with friends. Stop reading that book and enjoy a quiet evening with my husband. Get outside with Tigah-now more, which will benefit both of our health. I hope to enjoy more sunsets and more time spent outside if we get to build our deck this year.
Lots of things to look forward to in the coming year. Here's to 2010 and a new chapter of my life. :)
~Col
PS~I have taken my P365 photos, but I'm too lazy to post them every day. So every few days you'll get a couple. :)
“2010 is an unwritten chapter…love deeply, live boldly, and go after something big!”
I hate resolutions, so I try not to make them. Are there things I want to improve upon in my life? Of course! But resolutions only end up making you feel like crap because you don't complete them. But I want to love deeply, and live boldly, and go after something big, so that works out nicely :P
I want to show my husband how deeply I love him, all the time.
I want to live boldly and do big things.
I want to seriously work on my photography skills, and put myself out there to do pet photography sessions.
I want to really work on stationary designs for a new website, and grow that aspect of my creativity.
I want to continue to grow creatively as a hybrid artist, and a life artist.
Professionally, I'll be taking the PE Exam in April (which terrifies me), and taking on more responsibility in the coming year. I hope to grow as an engineer and as a project manager. I hope to solidify my career before we decide to start a family and things get thrown upside-down.
2009 turned into a whirl-wind of a year and just FLEW by. I know that time slows for no man, but I hope to slow things down a bit and learn to enjoy life more fully. Put that project aside and get together with friends. Stop reading that book and enjoy a quiet evening with my husband. Get outside with Tigah-now more, which will benefit both of our health. I hope to enjoy more sunsets and more time spent outside if we get to build our deck this year.
Lots of things to look forward to in the coming year. Here's to 2010 and a new chapter of my life. :)
~Col
PS~I have taken my P365 photos, but I'm too lazy to post them every day. So every few days you'll get a couple. :)
Tuesday, December 29, 2009
Altered Gingerbread House
So this is the infamous project I alluded to in my first 2 posts all those weeks ago. The altered gingerbread house. I bought the little house in September and was supposed to make her into a funny little haunted house. Except I forgot that one little detail of getting married, and she got tossed to the wayside. But all was not lost! I rescued her from the dark corner of the room where I had shoved her, and made her into the cutest little gingerbread house you ever did see!! Naturally I also meant to document this for a tutorial, and promptly forgot to take pictures until she was done. But, I will explain what I did, step by step, for those interested.

First, I painted the edges of the roof and windows and door, and the chimney. I knew that the paper I was using would be brown, so I took some brown paint and added some black to it, to darken it up a bit. Not a perfect match, but I'm a "close enough" kinda girl when it comes to that. I figure everyone will be looking at the rest of the adorableness of the house, not the edges of the roof. :)I also painted the base, the window panes, and the inside of that main doorway white. I knew I would be adding some "snow", so I wanted a white base, and I like white window panes.
Next up, was measuring the largest dimensions of the various sides of the house and roof. While there are several sides that aren't square (and a square is rarely a perfect square), the easiest way I've found for covering altered wood pieces is to take the largest dimensions to the next closest increment. So instead of something being 2 1/16" x 3 5/8", I make it 2 1/8" x 3 3/4" so that I have a little wiggle room all around. I use a pencil and write the dimension directly on the wood so that I know what piece goes where.
Then I open up photoshop and start playing! I added extra lengths to the roof pieces because I knew I wanted to use a decorative edge punch to make them special. Other than that, I use my slightly larger dimensions that I've written on the wood piece. I like to open up new documents for each piece, even if multiple sides are the same (like the front and back on this one, or the 2 sides). If I resize a paper to make the pattern fit better, then I drag the resized paper from one document to the next to make sure that all the patterns all the same. For the gingerbread house I resized the plaid and dragged it onto 6 different documents.

Once I've squeezed all I can out of a sheet of paper, I print the whole project out. Sometimes I'll wait to do another project to add to the sheet to save space and avoid waste. Once everything is printed I let it dry for a little bit. Generally this is unnecessary, but I still like to give the paper time to dry to ensure no smudges. Then I take my time and cut everything out. I usually cut out big chunks, and then trim things nice and neat.
Now comes to fun part. Since nothing is actually square, and since everything was printed slightly larger to allow some wiggle room, all the pieces will need to be trimmed to fit. The sides of this house were mostly rectangles, so I held 1 end of the paper up tight against where it met the roof, and then I traced the outline for the edge of the side with a pencil on the back of the paper. I trimmed and tweaked as needed (I rarely cut straight, so most times I end up need to shave little bits of paper here and there, lol), and then I put it back in place up against the roof, and folded the bottom down until the fold was right at the base. I used a small scraper tool to get it tight up against the base, and then folded it over and creased it with a bone folder. I left the window covered, and came back to that later.
For the front and back with the strange shape, it was a slightly different process. First, I held the paper flush with the base. Then I pressed it as close to the back as I could and traced the diagonal lines for the sides onto the back of the paper. I trimmed that down, and then I used the folding technique to get the top side edges just right. I use one of those processes for all the pieces I have, and I do all of them together so that it gets over and done with, lol. It's a process for sure, but it's the fastest process I've tried.
Once all the cutting and trimming is done, it's time to glue! I use a paint brush and mod podge for my altered wood projects. A thin-ish layer of mod podge, then just stick the piece on and hold it in place. I like to use an old bone folder to get in the cracks and smooth things out nicely (just don't push too hard or you'll scrape and smudge the paper). Normally, that's it! You're done! Do a dance! But for this project, I wanted to add some soft looking snow to the house. I had some white glitter, but then I discovered that Martha Stewart has flocking powder available (I got mine at Michael's). So I snagged a bottle of that and went to town.
First, I laid down a thick layer of glossy accents on the base of the house, and then I generously shook on the flocking powder. Some chunks came out, but that worked out fine as they looked more like real snow. I did a layer everywhere and then stopped for the night for the glossy accents to dry. The next morning, I checked it out and the glossy accents had turned yellow! :( It dries clear on everything else, but naturally, not this project. So I then did 2-3 more layers using watered down mod podge. I added some mod podge to a section of a painters tray, and then lightly brushed it over top the existing flocking powder. You can still see some yellow in spots, but not nearly as bad now.
And that, was that. It took several days to complete with the flocking powder issues, but just the house only took me an afternoon! Such a great project, I really can't wait to make something else. I'll definitely be making another Christmas house next year. I'm thinking I can make a whole little village!
Have a good one!
~Col

First, I painted the edges of the roof and windows and door, and the chimney. I knew that the paper I was using would be brown, so I took some brown paint and added some black to it, to darken it up a bit. Not a perfect match, but I'm a "close enough" kinda girl when it comes to that. I figure everyone will be looking at the rest of the adorableness of the house, not the edges of the roof. :)I also painted the base, the window panes, and the inside of that main doorway white. I knew I would be adding some "snow", so I wanted a white base, and I like white window panes.
Next up, was measuring the largest dimensions of the various sides of the house and roof. While there are several sides that aren't square (and a square is rarely a perfect square), the easiest way I've found for covering altered wood pieces is to take the largest dimensions to the next closest increment. So instead of something being 2 1/16" x 3 5/8", I make it 2 1/8" x 3 3/4" so that I have a little wiggle room all around. I use a pencil and write the dimension directly on the wood so that I know what piece goes where.
Then I open up photoshop and start playing! I added extra lengths to the roof pieces because I knew I wanted to use a decorative edge punch to make them special. Other than that, I use my slightly larger dimensions that I've written on the wood piece. I like to open up new documents for each piece, even if multiple sides are the same (like the front and back on this one, or the 2 sides). If I resize a paper to make the pattern fit better, then I drag the resized paper from one document to the next to make sure that all the patterns all the same. For the gingerbread house I resized the plaid and dragged it onto 6 different documents.
Once I have all the papers set, I flatten the documents and open 1 or 2 new documents at 8.5"x11" for printing. I try and fit as many pieces onto a single 8.5"x11" sheet as I can, to maximize my paper stash. I rotate pieces as needed to make them fit. If I am also printing elements (such as the gingerbread people and the little sign on the front) I resize them to make them somewhat proportional to the project. For this project, I sized them in the document of the striped paper to see how big they would be. I guessed on the doorway size, but I did ok cuz they can actually fit through!

Once I've squeezed all I can out of a sheet of paper, I print the whole project out. Sometimes I'll wait to do another project to add to the sheet to save space and avoid waste. Once everything is printed I let it dry for a little bit. Generally this is unnecessary, but I still like to give the paper time to dry to ensure no smudges. Then I take my time and cut everything out. I usually cut out big chunks, and then trim things nice and neat.
Now comes to fun part. Since nothing is actually square, and since everything was printed slightly larger to allow some wiggle room, all the pieces will need to be trimmed to fit. The sides of this house were mostly rectangles, so I held 1 end of the paper up tight against where it met the roof, and then I traced the outline for the edge of the side with a pencil on the back of the paper. I trimmed and tweaked as needed (I rarely cut straight, so most times I end up need to shave little bits of paper here and there, lol), and then I put it back in place up against the roof, and folded the bottom down until the fold was right at the base. I used a small scraper tool to get it tight up against the base, and then folded it over and creased it with a bone folder. I left the window covered, and came back to that later.
For the front and back with the strange shape, it was a slightly different process. First, I held the paper flush with the base. Then I pressed it as close to the back as I could and traced the diagonal lines for the sides onto the back of the paper. I trimmed that down, and then I used the folding technique to get the top side edges just right. I use one of those processes for all the pieces I have, and I do all of them together so that it gets over and done with, lol. It's a process for sure, but it's the fastest process I've tried.
Once all the cutting and trimming is done, it's time to glue! I use a paint brush and mod podge for my altered wood projects. A thin-ish layer of mod podge, then just stick the piece on and hold it in place. I like to use an old bone folder to get in the cracks and smooth things out nicely (just don't push too hard or you'll scrape and smudge the paper). Normally, that's it! You're done! Do a dance! But for this project, I wanted to add some soft looking snow to the house. I had some white glitter, but then I discovered that Martha Stewart has flocking powder available (I got mine at Michael's). So I snagged a bottle of that and went to town.
First, I laid down a thick layer of glossy accents on the base of the house, and then I generously shook on the flocking powder. Some chunks came out, but that worked out fine as they looked more like real snow. I did a layer everywhere and then stopped for the night for the glossy accents to dry. The next morning, I checked it out and the glossy accents had turned yellow! :( It dries clear on everything else, but naturally, not this project. So I then did 2-3 more layers using watered down mod podge. I added some mod podge to a section of a painters tray, and then lightly brushed it over top the existing flocking powder. You can still see some yellow in spots, but not nearly as bad now.
And that, was that. It took several days to complete with the flocking powder issues, but just the house only took me an afternoon! Such a great project, I really can't wait to make something else. I'll definitely be making another Christmas house next year. I'm thinking I can make a whole little village!
Have a good one!
~Col
Monday, December 28, 2009
WOOT!
Check it out! I finally got this thing looking pretty!! Zoe's Blog in a Box products rock my socks :) Now it's nice and wintery and pretty. I have an obsession with Snowmen (they are really the only thing I can say that I collect, other than craft supplies :P) so this was perfect :)
We had a very merry Christmas with Jordan's family this past weekend. On wednesday night we head to NY to celebrate the holiday with my family and ring in the New Year. We're going out to dinner with the adults, and then out to the bar with my brother, sister, and their friends. Should be a lot of fun!!
I've got a few hybrid projects in the works, as always. SSD keeps me busy! Lol! I have another project with a design I guested for this month as well. That one I REALLY need to finish tonight if I can. I'm reallly excited to finish it so I can USE it! Lol! I make all these things and then give them away or they get stuck in a box somewhere.
I really hope to make this whole blogging thing more of a habit in the new year. I'm thinking of (yes, again) doing a Project 365. I was GOING to do it starting with the wedding, but things were hectic and then the honeymoon and coming home and having 84032 things to take care of.....just didn't happen. I think I'm going to come up with some photography challenges to work on each month, just to shake things up and keep it interesting.
Ok, almost time to head home. I'll catch ya later!
~Col
We had a very merry Christmas with Jordan's family this past weekend. On wednesday night we head to NY to celebrate the holiday with my family and ring in the New Year. We're going out to dinner with the adults, and then out to the bar with my brother, sister, and their friends. Should be a lot of fun!!
I've got a few hybrid projects in the works, as always. SSD keeps me busy! Lol! I have another project with a design I guested for this month as well. That one I REALLY need to finish tonight if I can. I'm reallly excited to finish it so I can USE it! Lol! I make all these things and then give them away or they get stuck in a box somewhere.
I really hope to make this whole blogging thing more of a habit in the new year. I'm thinking of (yes, again) doing a Project 365. I was GOING to do it starting with the wedding, but things were hectic and then the honeymoon and coming home and having 84032 things to take care of.....just didn't happen. I think I'm going to come up with some photography challenges to work on each month, just to shake things up and keep it interesting.
Ok, almost time to head home. I'll catch ya later!
~Col
Thursday, November 12, 2009
Layout
I'm working on finding a pretty new template for this blog. I found a handful that I really like, but I need to figure out how to edit and alter them to suit my taste. :)
I didn't get to work on anything crafty last night unfortunately. Since I left so early on Tuesday to go to Social Security and get my name changed, I had to make up a bunch of work that was due today. Sucked, but it is what it is. Jordan and I just hung out and watched tv off the DVR. Aaaaaaalmost caught up with everything we missed while we were gone for almost a month.
I'll be doing a wedding wrapup post soon. Hopefully. I really want to give a shout out to all the amazing vendors that we worked with, all of whom made our day absolutely amazing. I'm DYING to get the DVD of images from our photographer. He and his assistant did an absolutely incredible job, and I'm so in love with some of the images that they captured. The one of our entire bridal is EXACTLY what I had envisioned. Incredible.
More to come,
~Col
I didn't get to work on anything crafty last night unfortunately. Since I left so early on Tuesday to go to Social Security and get my name changed, I had to make up a bunch of work that was due today. Sucked, but it is what it is. Jordan and I just hung out and watched tv off the DVR. Aaaaaaalmost caught up with everything we missed while we were gone for almost a month.
I'll be doing a wedding wrapup post soon. Hopefully. I really want to give a shout out to all the amazing vendors that we worked with, all of whom made our day absolutely amazing. I'm DYING to get the DVD of images from our photographer. He and his assistant did an absolutely incredible job, and I'm so in love with some of the images that they captured. The one of our entire bridal is EXACTLY what I had envisioned. Incredible.
More to come,
~Col
Wednesday, November 11, 2009
Hello World!
Helloooooooo out there in the big bad world! After a long hiatus from blogging, I really want to get back into the swing of things. I decided that I needed to separate out most of my personal blogging (it made my husband uncomfortable) from the craft blogging that I want to be doing. So this blog will be all about crafty things (hopefully, sometimes I just get to rambling and can't help myself). With the new name (married 1 month today!) and the new email, I figured I might as well start fresh with a new blog too. So here goes!
I'll hopefully get it prettied up soon, and get things going here. I'm in the middle of a fantastic little hybrid project for SSD that I am AMPED about, and I'm going to try something different and do an actual hybrid layout soon too. I have this photo from the honeymoon of the Eiffel Tower that is just begging for a hybrid layout with some layering and stamping and pretty flowers. Hopefully I'll get to that this weekend!
More to come, see you soon!
~Col
I'll hopefully get it prettied up soon, and get things going here. I'm in the middle of a fantastic little hybrid project for SSD that I am AMPED about, and I'm going to try something different and do an actual hybrid layout soon too. I have this photo from the honeymoon of the Eiffel Tower that is just begging for a hybrid layout with some layering and stamping and pretty flowers. Hopefully I'll get to that this weekend!
More to come, see you soon!
~Col
Subscribe to:
Posts (Atom)